Showing posts with label terrain. Show all posts

Thursday, August 22, 2013

Basing Texture Revelation!

I started off trying to do this hobby on the cheap using household kitchen ingredients, like shredded coconut instead of flock, but soon realised that bought texture looks a whole lot better than home-made! 

I started by flocking the bare base which did little to disguise the 'step' where the figures' bases met the cardboard. By lucky chance I was in a craft shop with my girls when I discovered coarse artists' gel. It's been my chosen texture ever since. A while ago I was in an art shop looking for holiday projects with the girls when I spied some pumice mortar. As I was running low on the coarse gel and this art shop didn't seem to have a similar product, I bought a tub of this stuff to see how I'd go. At around A$15 I thought it wasn't too outrageous a cost if it doesn't work.

I recently ran out of my coarse gel and thought I'd give the pumice mortar a go, and I'm glad I did! It really is terrific stuff. It's an acrylic resin with tiny chunks of pumice in it so it literally sets as hard as stone. It's a bit hard to work with out of the tub, but after a little experimentation, I found it works best if diluted slightly, which makes it much easier to spread evenly.

I also experimented with colour as it makes earth tones too dark for my taste if applied straight on to the dried pumice. I can't remember which blog it was, but I recall someone using a pale flesh base undercoat for terrain, so on my latest battalion I tried that, then applied a wash of earth tones that sunk into the gaps, leaving the lighter tones exposed. I think it works quite well!

Does anyone else have any top basing tips?

The end result; not too shabby at all!

As recommended by Johnny Rosbif!

The raw stuff; not very attractive, but comes up well in the end!

Sunday, May 12, 2013

HaT Infantry Conversions and Amera Scenery WIP

I've started another French battalion for Borodino, this time back with plastic HaT figures. This time, though, I've experimented with head swaps for the elite figures. The originals are bedecked in cords and plumes, so I decided to give them a more campaign look by transplanting ordinary shako-wearing heads without the fancy trimmings. The heads came from surplus figures of the same set.

Converted voltiguer

Original figure painted in Italian colours

Second voltiguer figure with head conversion

Original pose.

Converted grenadier
Original bearskin wearing figure.

I've also put the first licks of paint on a piece of Amera moulded plastic scenery bought from club member and top bloke, Garry, and his online store Wargames Miniatures. This is a river section with a ford. I like the natural looking meander that the river makes in this piece, a sight more realistic that the straight sections I've got. I'd love to get another couple of sections eventually, so Garry, I hope you get some more soon!

It looks a lot brighter and more primary in the picture than in real life! I'll put some more shades on the road and banks and flock the rest of of the section. 

Wednesday, October 24, 2012

Movement Trays - part 2

I've used up the last of my sheet metal to create movement trays for infantry in line formation.

While my British formations don't spend as much time in column formation as my French troops, it gets tedious moving a whole formation forwards once deployed in line. After the successful modification of my column movement trays, I thought I'd give line movement trays a go. I'd always toyed with the idea, but it always seemed more trouble than it was worth. Hopefully with the wider lip, it will make picking a whole formation up easier than the tray design I used previously. The tray will get a test this weekend and if it's a success, I'll make more for the other regiments.

If nothing else, it will certainly make my troop formations prettier!

I think it works quite well.

Movement trays modelled by the 3rd Regt. of Foot (Buffs)

Sunday, October 21, 2012

Movement Tray Modifications

I've found my home made movement trays are almost as much trouble as not having any, so I thought it time to modify them to make them more practical, as well as more aesthetically pleasing.

As I've mounted all my figures on bases backed with fridge-magnets, my first iteration of the movement trays were just metal sheet cut in the shape of the column formation. While it looked fine, flush with the table, it turned out to be impossible to pick up. So I added a thicker layer of balsa, or cardboard, under the sheet metal to aid the portability of the trays, the very fact that they were home-made meant that they weren't as accurately sized as the commercially available laser cut bases, and therefore still were problematic in the portability stakes. If you're not careful, picking them up can cause the figures to pop off the base, as part of the finger's pressure was applied to the figures as well as the tray.

I've been meaning to do something about this for a while and have now bitten the bullet by the horns (and other mixed metaphors), to make something a little more practical as well as pleasing to the eye.

Original cardboard backed metal sheet movement tray

With battalion attached

Tray glued to cereal box cardboard.

Coarse gel applied to lip

The new, improved movement tray after terrain-scaping. Front view...

...and side-view.

Wednesday, April 11, 2012

Easter update

Well, I'm down one assignment with one still to go, but I've been busy with my procrastination projects!

My Westphalians are finished, only waiting to be based; I've received my order of 1815 French Infantry from Schilling Zinnfiguren in Germany; and I've started a terrain project using fabric from a pair of old jeans which I cut into strips for roads.

I'll post pictures of the Westphalians and the Schilling figures later in the week, but today I'll share with you my new method for road building.

Early on in this blog I made roads using kitchen sponges and putty, which look excellent but had the disadvantage of curling up when dried so they never lay flat. I solved that problem by gluing them to pieces of thin balsa wood, which worked, but left them thicker than I was intending. I was still left with the problem of having rigid road pieces which could only be used on hills if you didn't mind having ramps, which I do!

After a pair of favourite black jeans wore through around the crotch (Oo-er, Matron! What have I being rubbing against I hear you all ask; get your minds out of the gutter!), I decided to cut the jeans into straight strips and other shapes, like curves, cross-roads, intersections etc. After ironing the strips I initially thought I'd spray them using some left over cans from another terrain project, but that didn't seem to take too well on the denim.

Basic shapes 

First attempt with spray paint

After that, I just slapped on some art acrylic directly on to the fabric and then added a little flock and railway ballast using PVA. The result is a semi-rigid, yet still flexible terrain piece which I think will work well with the rest of my terrain pieces, both bought and home-made!

Painted and railway ballast added with PVA

 Contour hugging finished product.


Monday, September 19, 2011

Keep off the grass!

My boss was investigating the possibility of having a small bare concrete balcony area at work covered in fake grass for the official opening ceremony of our new library, so she sent off to a supplier for some samples. I saw them and immediately saw wargaming terrain potential. Long story short; they're now mine, all mine!

There are contemporary accounts of armies marching through head high crops of cereals and literally bumping into or at least being surprised by the enemy because they couldn't be seen through the standing crops. Think of Quatre Bras where French lancers surprised the 42nd Highlanders before they could form square because  '...the stalks of rye, like reeds that grow on the margins of some swamp, opposed our advance; the tops were up to our bonnets, and we strode and groped our way through as fast as we could.' (Sergeant Anton of the 42nd Highlanders).

I think these'll do very nicely!

The astro-turf sample
French voltiguer hiding in the crops

Monday, August 29, 2011

Anyone for (table) tennis?

I've just got an early birthday present from Mum; a table-tennis table. Besides providing the family with another sporting option, I now have a dedicated table and space in the shed for non-club wargaming. Huzzah! 

Other times when I've hosted a game at home the only option was adding the leaves to the table and taking over the dining room.It wasn't optimal as the table is relatively narrow. Now I can use all the tiles and terrain and have plenty of room for maneuver.

Below are some of the figures I'm working on at the moment; Royal Marines and Jack Tars for the sea landing scenario and more of Jim's Soviets. The last photo is of the progress of the fortified camp I'm making as the objective of the sea landing scenario. The earthwork positions are laid on top of  a polystyrene foam layer with a trench cut into it and the edges roughly cut to produce a glacis. I'll build the glacis up a bit more and add a flechette to cover the gates. The defenses will have a damage point system which, depending on the calibre of artillery firing at it, will determine when a practicable breach is made.


HaT Royal Marine


HaT sailor

Plastic Soldier Soviet. Love the facial expression!

Soviet command figure


Soviet rifleman. Lovely animated sculpt

Fortification WIP

Friday, March 11, 2011

Broken ground terrain

In my continuing quest to clutter up my gaming table-top, I've made myself a couple of patches of broken ground to block cavalry and formed units. Perfect terrain for lurking skirmishers or guerrilla types!

I used up some of the last bits of the versatile thin corkboard, torn up into rough shapes as the footprint for the broken ground and added a couple of generous dollops of timber putty, smoothed down with a craft stick and some water (which makes shaping the putty easier) into a couple of  low hillocks. Some rocks and pebbles from the garden were added and the whole lot left to dry overnight.

Next day, the putty had dried, but turned out a lot blonder than it was when wet. I then painted over the putty, carefully avoiding the stones. After the paint dried, I painted on the PVA glue and gave them a light dusting of Woodland Scenics burnt grass flocking, added a clump or two of foliage and added a couple of twigs from the garden which do a good job as fallen timber.

Putty in my hands (Mwah-ha-ha!)
The larger patch of ground with putty and stones.
The 2nd piece with a large chunk of concrete masquerading as granite.
1st piece flocked (PVA still wet)
2nd piece flocked
1st piece with added twigs (sorry about the lighting)

Tuesday, March 1, 2011

Feb WIP #2

My Italian Grenadiers of the Royal Guard are coming along nicely. Although I only need 3 figures with our proposed 1:120 scale, I'm going to paint up the usual 9-12 figures for the 1:60 scale we commonly use. Same goes for the Chasseurs and Velites of the Guard; they'll only need 3 and 5 figures respectively for the 1:120 scale, but again I'll paint up enough for use in the 1:60 games, too.

Pedants among you may have noticed a couple of mistakes that I've rectified since taking these photos: the collars should be green and the officers' epaulets and gorgets should be silver. I also think I've cocked up the cockades (pun intended!) with the wrong colour combination, but I don't think I could be fagged changing it.

I've also made another head conversion from an SHQ/Kennington French Line infantry officer in shako, swapping his head with a bicorne wearing head from HaT's 8095 1808-1812 Line Infantry set. Worked quite well, I think. He'll be the officer figure for the Chasseurs of the Royal Guard. Not sure what I'll do for the Velites; I might actually have to buy a figure as the HaT Chasseurs of the Guard set doesn't come with officers. I might have to buy the SHQ/Kennington Chasseur command set to flesh it out.

I haven't painted Zvezda figures for a while (I have got the Cuirassiers and Lancers of the Guard sitting in boxes gathering dust!) and the detail is amazing, although very fine. After being used to the chunky sculpting of HaT, it was a little daunting trying to follow the very fine details on the figures. The officer figures have the best sculpting, viz. the flag bearer, but the other ranks figures had almost non-existent detail especially around the arms of the firing figure. One of the first sets I painted was Zvezda's Voltiguer infantry which almost defeated me as a neophyte painter, but I've had enough trial-and-error experience to be able to bodge-up a fairly accurate looking uniform where the detail is lacking.

There's also a picture of my latest tree creations, this time made from pieces of an old fake Christmas wreath  stuck on to a couple of trimmed dead twigs from a rose bush, which in turn are pinned and glued to the cork-board base

Eagle bearer. The text is in French, but you'd have to have pretty good eye-sight to notice! Likewise the number one in the flag's corners has been obscured to try and make it look like a flaming grenade.
Same figure from behind. I haven't added the buttons on his pockets yet.
Drummer.
From the front.
Officer with gold metal-work. Has been changed to silver since this photo, and the collars to green.
Rear view
Grenadier reaching for a cartridge. I love this pose; he looks so contemptuous of the enemy, nonchalantly reaching behind him.
Firing figure. Under the arms and where the musket butt meets his shoulder is a very indistinct area that is the trickiest bit to paint, I found.
Xmas decoration trees.

Head conversion for Chasseur officer.

Monday, February 21, 2011

Terrain WIP


Last Saturday's game was a bit of a weird one (no pics as camera didn't make it to the club. Ooops!) as we were experimenting with 1:120 scale in preparation for applying it to the Wagram scenario in the not too distant future. This worked well for those playing French and Austrian, but for Quinny and I using British and allied troops it posed more problems than solved. Also against us was the fact that everyone bar John W. had misinterpreted Tim's instructions and come along with half sized forces rather than doubling the points and turning up with the usual number of troops. As a result we had lots of space to play with!

British forces of the period were made up usually of 1 battalion regiments, the 2nd battalion usually being a depot battalion back home. Even though some 2nd battalions were deployed, they rarely fought with their senior battalion in the same brigade. Therefore, Quinny and I were at a disadvantage from the start because we couldn't really pretend that one 1:60 British battalion was two 1:120 battalions brigaded together, as the French and Austrians could. We had tiny little 5 or 6 figure battalions facing 12 figure regiments! 

While Quinny was having trouble fending off John W's attacks, I managed to bamboozle John R with my number of tiny units able to get in on his flanks, even though his cavalry brigades easily saw off my individual squadrons. Quinny finished him off in the centre, but in turn was having trouble keeping the field with the pressure John W was putting him under. 

Anyway, the consensus was 1:120 doesn't really work for British forces in our rules.

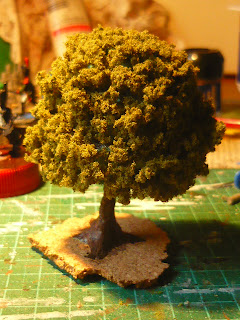
I've also decided that I need more terrain for my boards as I tend to have too much open space and not enough woods and other impedimenta for my liking. So, I 'borrowed' some felt from my daughter on the condition that I replace it, for the forest footprint, and made myself some more trees.

When I began this hobby I experimented with making my own terrain and found a tutorial online (can't remember where now) on how to make trees from kitchen scourers and roofing nails. The results weren't exactly to my liking, so I flocked the canopy  to make the foliage look more leafy. After a lot of handling and use, the flocking that remains looks a little threadbare. I left the trunks bare which made them look a little scrawny, too, so this time I've broken out the old Miliput again to sculpt more realistic looking trunks and roots and used Woodland Scenics undergrowth to provide a more coarse foliage which all in all makes a fairly convincing looking oak tree. 

After seeing teddy bear fur used in wargaming terrain here, I experimented with a small patch to represent a standing cereal crop that you may have seen in some of my previous posts. I still have quite a bit of fur remaining and as I have been suffering from insomnia for a while now, I thought I'd put my wakefulness to good use and create a larger field complex of 3 different crops. I used scissors to trim the path through the crops as well as to trim rows through the bottom right crop, then dry brushed 2 shades of green and some earth tones through the main field, a combination of black, grey and brown along the paths and a slight hint of green through the rows while leaving the bottom left quadrant in its original state. I'm quite pleased with the results!

Rough circles cut from scourer after tracing circles using different sized bottle-tops. Largest at bottom to smallest at top of tree. Holes made by pushing nail through WARNING: try not to impale yourself while doing this!
Roofing nails stuck though roughly ripped pieces of thin corkboard

Milliput added and sculpted to look like tree trunk and roots. Painted dark brown with lighter tones dry brushed on.

Scourer circles stuck on nail, then generous amount of white glue applied to the surface. Flocking applied and pressed into glue. Once it begins to dry, I gave the foliage a generous squirt with matt varnish which acts like hairspray to keep it all together. Base still requires some static grass/flocking.

Teddy bear fur crops
Related Posts Plugin for WordPress, Blogger...

My Shelfari Bookshelf