 |
| The Cossacks in question! |
I hosted a scenario for at the club last weekend for 5 players set in Deepest Russia. It was loosely based on the previous scenario loosely based (loosely!) on the
Battle of Boyaca which I'd run previously. (See
here for a reminder).
The premise was that the Russians guarding a strategic river crossing had sent out a reconnaissance in force to find out where the French were. To their consternation, the French were a lot closer than they expected, so a race developed to secure the river crossing and deny it to the other side.
I thought that for an exciting twist that forces would enter the board at random times and locations determined by dice rolls. First each player would roll to get their respective vanguard (up to a third of their total force) on the board. Then two turns after their vanguard enters the board, each player rolls for their main body and where it enters the board. A recipe for hijinks and pratfalls, I'm sure you'll agree!
As it was two French players vs. 3 Russians, Vana and I got to field 1500 points each while the Russians (Darren, Jim and Paul) had 1000 points each. I had made my list up for an even 2000 points on the off chance that another French player would join, but actually forgot to knock off the extra 500 points when deploying my main force, sorry Russians! (not that it actually helped me as you'll soon notice!)
 |
| The playing field: all sides of the board across the river, away from the camera were entry points for each player determined randomly by dice roll |
 |
| Darren was first to successfully roll to enter the board with his hordes of Cossacks on the right side of the board as viewed in the picture above. |
 |
| Close up of his lovely painting and basing style |
 |
| Vana's vanguard (it's got a nice ring, hasn't it?) enters the board from the opposite end from the objective |
 |
| A couple of turns later, my vanguard enters on the left |
 |
| Darren's cossacks sweep into the centre of the board to cut off any swift French advance on the river. |
 |
| Paul's vanguard enters closest to the river crossing on the right hand side of the board. Note; the Opolchenie were promoted to Jaegers for the purposes of this game! |
 |
| Jim's vanguard enters the board on my right flank which stymied my plans for racing to the river! |
I was surprised at how quickly everyone got at least part of their force on the board. I was expecting the momentum to ebb and flow as the upper hand passed from one side to the other, but no-one really established themselves before the others got on the board. It'd be interesting to play this again and see how differently the sequence of events turns out.
 |
| With cossacks to the front and left and jaegers and artillery to my right, my vanguard was feeling a little boxed in! |
 |
| Never fear! Vana's here! |
 |
Cossacks charged his flank.
Vana's infantry click their fingers, form square and yell particularly hurtful abuse until the cossacks run away. |
 |
| My infantry move forward behind their light cavalry screen |
 |
| The Italian 2nd Chasseurs make their debut! |
 |
| They screened the limbered artillery and infantry while they moved up and provided a link with Vana's advancing light infantry. |
 |
| My French chasseurs in echelon screening my infantry form the threat to the right. |
 |
| Vana's infantry march on while his general keeps a weather eye on the cossacks in the background. |
 |
| Jim unlimbers his guns... |
 |
| ...while his infantry form closed columns with their backs to the river! |
 |
| Vana's the first to get his main force on the board! Unfortunately it was in the exactly the same spot his vanguard came on, the furthest away from the objective as possible! |
 |
| He went for quality over quantity with a 12lb battery, dragoons and hussars as well as his elite and veteran infantry. |
 |
| In a risky, but ballsy move, Vana deployed the battalion in square back into line, daring the cossacks to charge. |
 |
| The remaining battalions of the regiment face the cossack threat to the front in closed column formation |
 |
| The cossacks take the opportunity charge and close in on Vana's brave infantry line, who fire before contact and empty several saddles, sending the cossacks fleeing. |
 |
| Vana's cavalry move forward to threaten the the flank of the mauled cossacks! |
 |
| Meanwhile, the remainder of Vana's vanguard (so alliterative!) push on to the objective despite the continuing cossack threat. |
 |
| Meanwhile, my guns unlimber and fire on the infantry square guarding Jim's artillery's flank |
 |
| I was hoping to cause them enough damage to throw in the cavalry and sweep away the damaged square and get into the artillery. Probably wishful thinking, though! Dragoons or cuirassiers maybe. Chasseurs? Probably not! |
 |
| General Ornano got his first Guernsey, too. |
 |
| Whatever was going to happen, I needed to get my infantry into a position where they could bring weight to bear, so I formed up my regiment |
 |
| Vana's impetuosity comes back to haunt him as both Paul's and Jim's infantry form up to threaten his flanks! |
 |
| The inevitable happened and after Paul charged Vana's flank and broke one battalion, a cascade of failed morale tests sent the rest of the regiment running, too! |
 |
| The high water mark: Vana's remaining battalions approaching the objective after the routing of the other battalion. |
 |
| Then they joined their fellows routing to the rear! |
 |
| At this stage, Darren rolled for his main body to enter the board; the rest of a whole cavalry division! This appeared next to where Vana's main force entered and threatened the rear of his newly arrived cavalry! |
 |
| Darren's lancers charge Vana's dragoons. Vana only just managed to about face before the lancers were on top of him, and so met them at a standstill. |
 |
| Paul's main body enter the board in Vana's flank and my rear! |
 |
| The state of play: Vana's and my vanguard in the foreground; Vana's main body dispersed between the middle and rear of the picture; Darren's main body in the far right corner; and Paul's in the far left corner! |
 |
| My vanguard facing Jim's, with Vana's remnants on my left, while Darren and Paul's vanguards hold the village |
 |
| The complexion of the game changes when my (too large!) vanguard appears right behind Paul's vanguard and the objective! |
 |
| Vana's dragoons got thumped in the flank after trying to extricate themselves from a 'damned if they do; damned if they don't' situation. |
 |
| Then his hussars got a surprise from Darren's hussars. A charge up the rear! Ooo-er matron! |
 |
| Run for your lives! |
 |
| My Italian chasseurs double back to threaten Paul's flank... |
 |
| ...while my infantry charge Jim's guns. I misjudged the distance and ended up just in front of the battery! D'oh! |
 |
| One battalion is broken in the ensuing barrage. |
 |
| Paul pivoted his guns to see off Vana's broken hussars (Paul helpfully takes them off the board for Vana. Such a gent!) |
 |
| Vana's penny packets of infantry distributed to block cossacks... |
 |
| ...and other cavalry. Note the guns in the background, though! |
 |
| Vana's main body between a rock and a hard place! Paul's Russian line charges Vana's column just beyond the wods. |
 |
| On the other flank, Jim's infantry advances boldly in closed column while Darren's dragoons lurk. |
 |
| I unwisely pivoted the chasseurs, precipitating am opportunity charge by Darren's dragoons... |
 |
| ...with the following results! Chasseurs and guns lost and Velites pushed back on to their supports. |
 |
| Back with my vanguard in front of the guns, I elected to charge the only battalion not directly facing the guns. I thought it was outside the arc of the guns' fire, but it wasn't! Casualties from the gun and the infantry caused a morale check I failed! If I'd charged the whole regiment, I might have spread the casualties and therefore survived any resulting morale test. Hindsight's wonderful! |
 |
| On Jim's turn, artillery fire breaks two more battalions... |
 |
| Run away! |
 |
| ...and the others soon follow! |
 |
| Suddenly, the pressure's off Jim's vanguard! |
 |
| After my main body cavalry debacle (see the background) I moved the remaining cavalry regiment (my Bavarians on debut) into Paul's artillery's flank |
 |
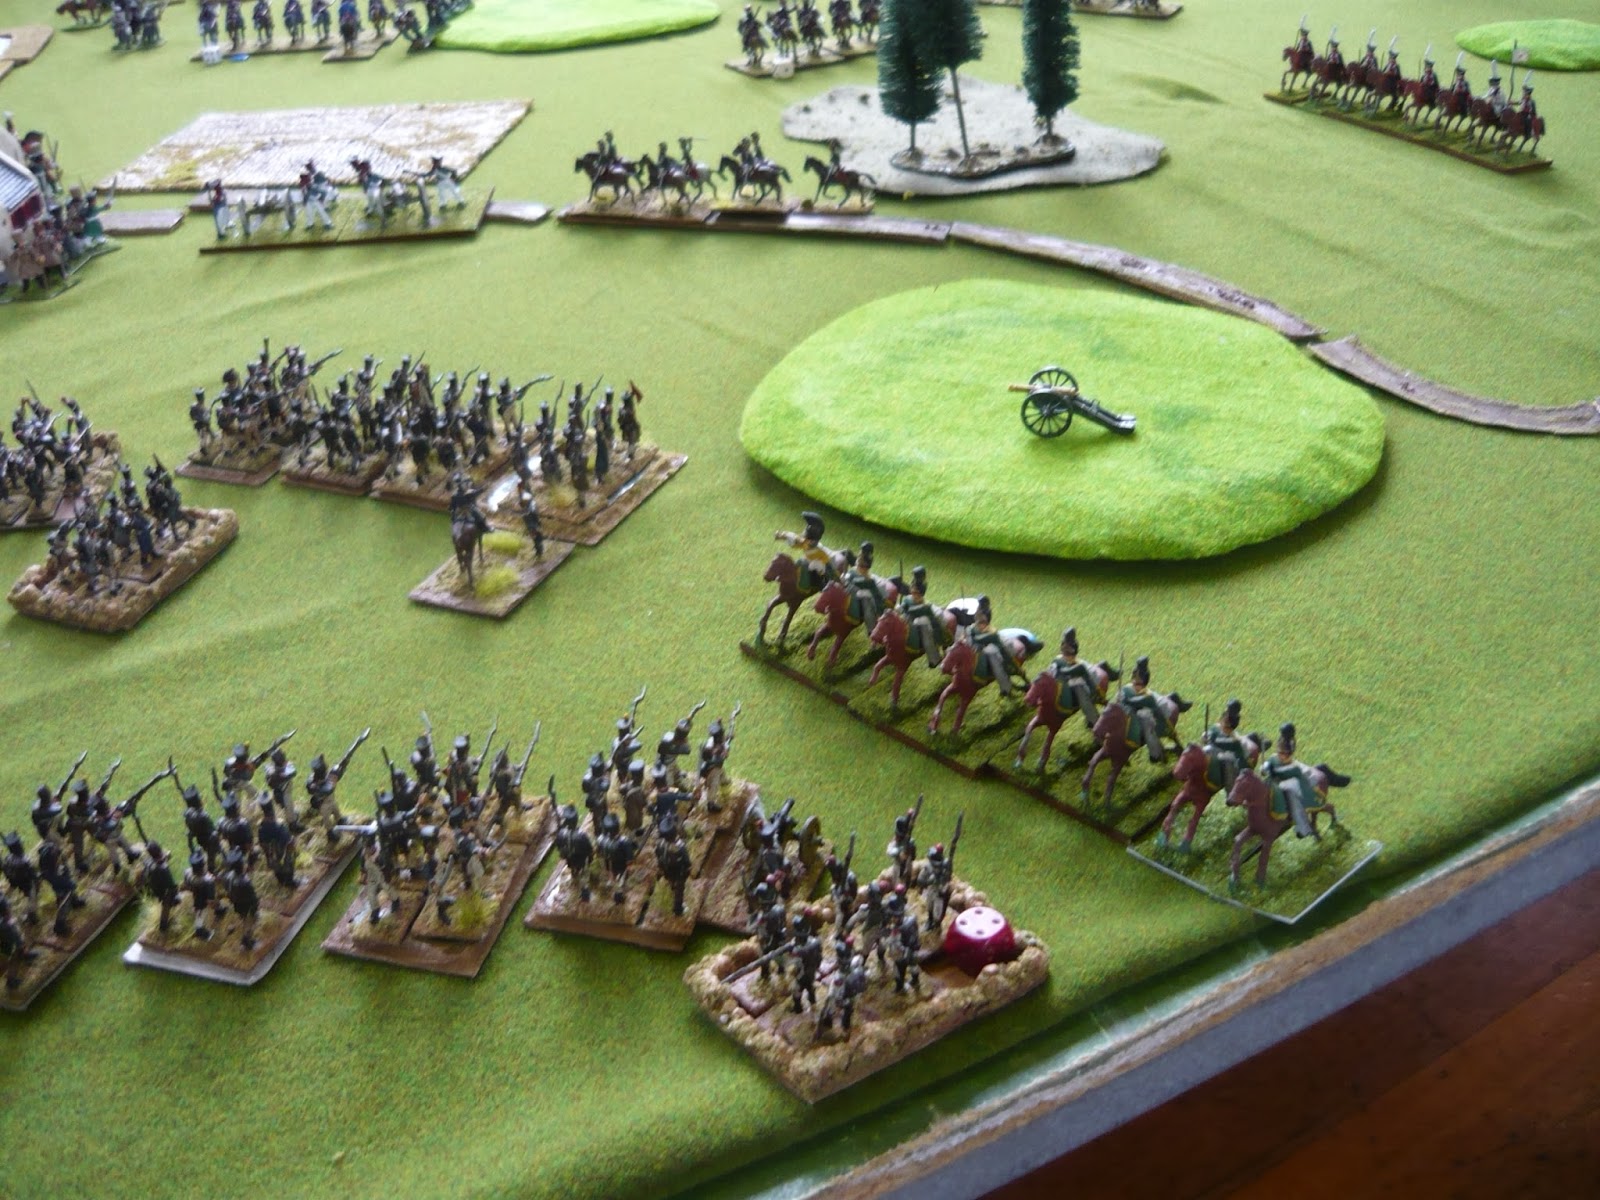
One of my brigades holding the centre.
One of the best photos of my troops in action IMHO! (you might notice a cropped version of this picture in the blog masthead) |
 |
| Darren's dragoons charge again! The Velites keep running and the battalion nearest the threat fails to form square in time. Luckily, the next in line did! |
 |
The dragoons are brought up by my solid square, blown nad with 2 disorders.
They are isolated amongst a lot of angry infantry! Not a good place to be for cavalry! |
 |
| In my next turn, I moved an infantry battalion into the dragoons' flank and fired. The cavalry's resulting morale test failed and they melted away like snow in spring! |
 |
| The Bav Cav lick their lips at the flank target! |
 |
| Curses! Darren's cossacks trot into MY flank to spoil the fun! |
 |
| No matter; they unleashed carbine fire into the artillery's flanks causing them to flee the guns for the village. How very un-Russian of them! Meanwhile, the infantry in closed column in support block the enemy cavalry. |
 |
| The rest of Darren's cossacks cause merry hell in the centre. Vana's infantry think they have the upper hand on the flank of one cossack unit, little realising they're about to be taken from the rear (ooo-er, matron! #2) |
 |
| What I'd been gearing up for all this time was for an attack on the BUA occupied by Paul's vanguard. The pre-melee was completely flubbed as I rolled a 1 while Paul didn't! Good night Irene! Any chance of gaining the objective now was gone. |
 |
| My vanguard was still active, though. Combined arms managed to get one of Paul's battalions running |
 |
| Run away! |
 |
Back with the main body, the cossacks charged my Bavarians in the flank.
They fled before contact was made! |
 |
| The cossacks continued on into the infantry who stood firm and repulsed their weak attack, while the artillery crews return to their guns |
With Vana's commands either being crushed in a vice form all sides, or being picked off piecemeal, and my failed attack on the village, it was clearly a Russian victory.
All Vana and I had to look forward to now was the Emperor's displeasure and a command in Spain!


Spain isn't so bad old chap - the food will be better.
ReplyDeleteThose Ruskies are really something, aren't they?
Great looking game - love those Cossacks. Best, Dean
ReplyDeleteThe cossacks are indeed very nice! The way in which the game unfolded and your retelling of it, makes for a exciting BatRep. It must have been fun to participate.
ReplyDeleteLove all the troops and the random entry. What a great way to change things up. Keeps everyone on their toes!
ReplyDeleteBeautiful! A great looking game, some fantastic looking units, like General Ornano or the Cossacks...
ReplyDeleteCheers,
Phil.
Now at one point I thought this might be going your way, but alas not this time! Great report Sir.
ReplyDeleteVery nice cossacks and great battle rteport!
ReplyDeleteRegards
Bruno
An excellent rip roaring report! You just gotta love them Cossacks!
ReplyDeleteThis was a terrific post, RB. Good narrative, and a nice variety of distance and close up shots. Great read.
ReplyDeleteFMB
Great game and report. Thanks for sharing. The cossacks are superb!
ReplyDeleteGreat looking game there Rosbif and a great batrep
ReplyDeleteThanks for the kind comments, Chaps!
ReplyDeleteDarren's cossacks were best on table, not just in their effectiveness, but visually as well! Also the light on a Saturday afternoon makes for perfect photography conditions. I think if I spent less time taking happy snaps and more concentrating on tactics, I might win a game one day! ;-)