It is a rare sight for me to attend the Croydon Saturday meeting, but I was there last Saturday with my French army to take on Quinny's British; always a fearsome prospect, but with the scenario he proposed I thought I might have the sniff of a chance. However, my dice disagreed (but more of that later!)
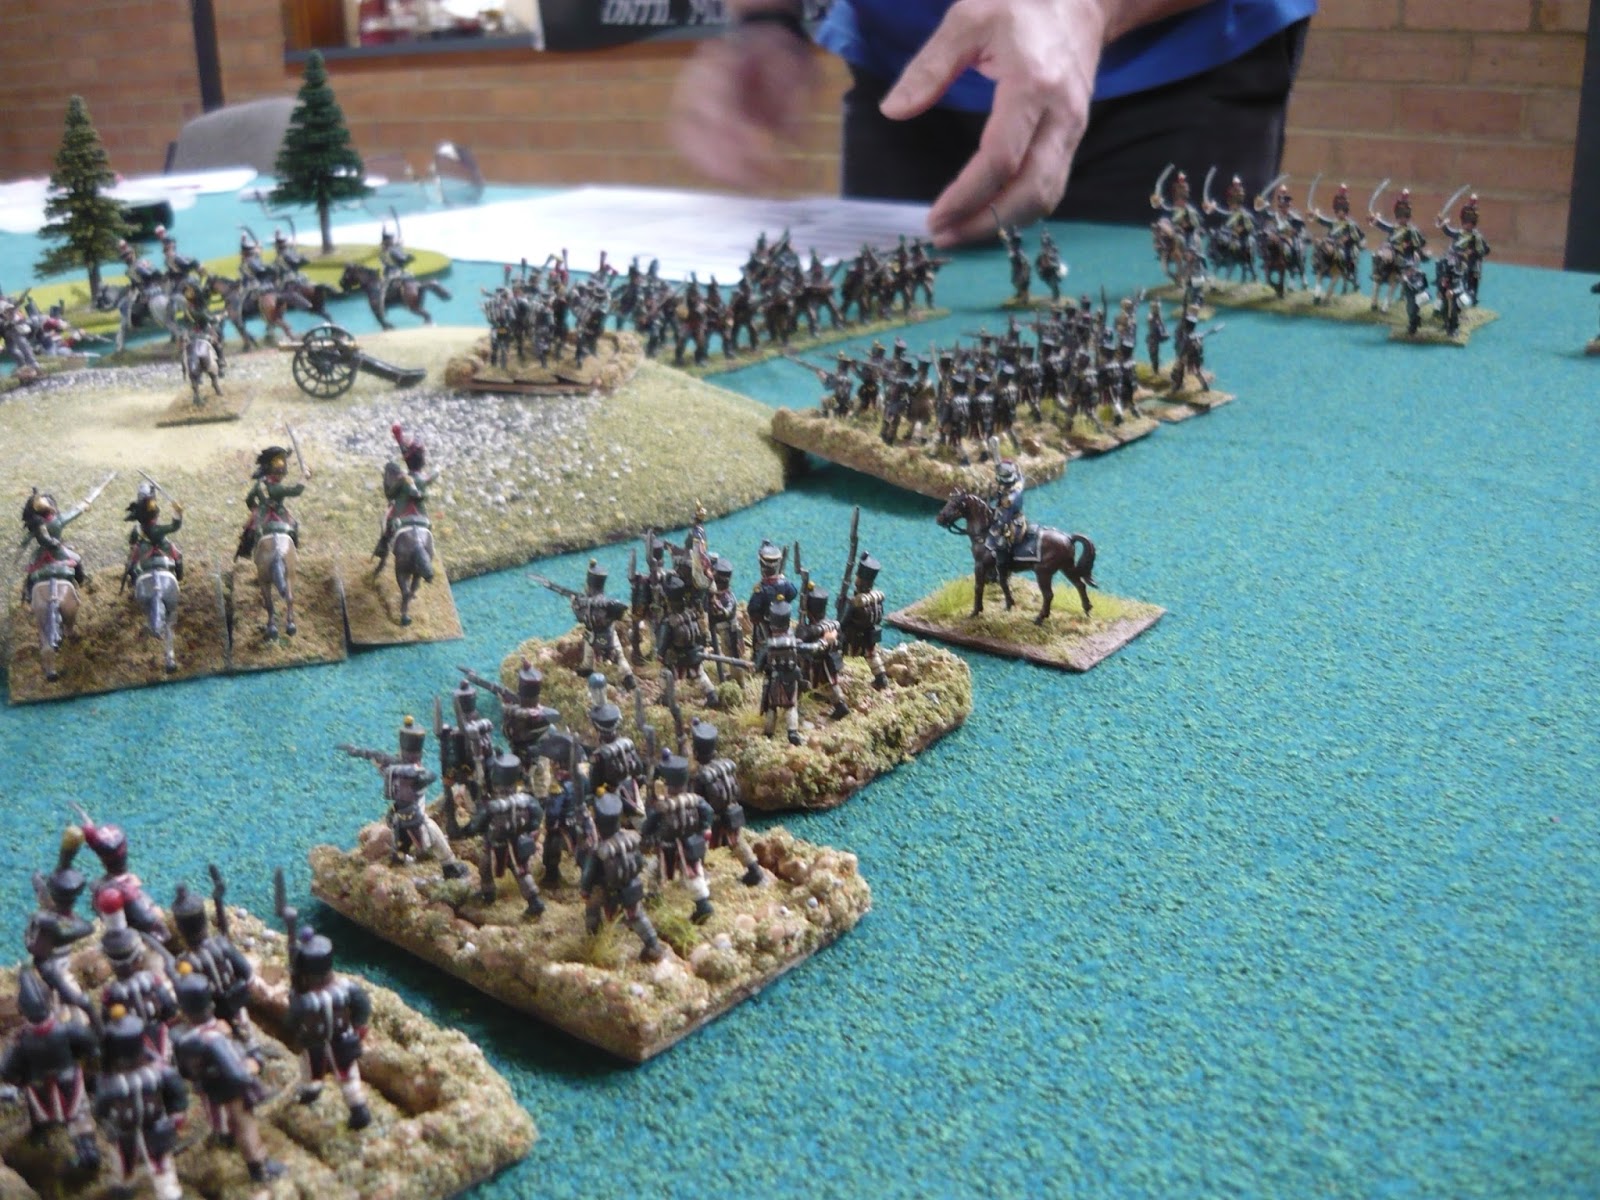
Quinny had suggested an encounter-style game, where each side has a vanguard, a main body and rearguard to come on the table at randomly decided times determined by dice rolls. After two turns with only the vanguard on the board playing cat and mouse with each other, we both got to roll the dice to see if our respective main bodies appeared on the board. In a sign of things to come, Quinny rolled the required 5 or 6 on a d6 while I didn't! Fortunately his main body only got to enter the board in column with the backs of the columns touching the edge of the board on the next turn. On my next turn I also managed to roll my main body onto the board, so it wasn't all doom and gloom (yet!). Though I think I have neglected to say that Quinny was fielding the Light Division, didn't I? I shouldn't have been in any doubt of the result really, should I? :-/
 |
| My French cavalry vanguard |
 |
| Part of Quinny's British and KGL cavalry vanguard |
 |
| I move forward, but there's no one home! |
 |
| There they are, on my flank! |
 |
| And back to the front again! |
 |
| A fearsome sight for French cavalry! |
 |
| "I say, Wichard old, chap, those damn Fwench wascals deserve a jolly good thwashing!" |
 |
| " We are not afraid of you, you smelly Eenglish!" |
 |
| The British main body enters the board |
 |
| Those pesky Green Jackets |
I thought I'd placed my dragoons in a position to threaten the flank of any potential hostile cavalry action, but as I'm a terrible judge of distance, I left the dragoons too far off the charge path for them to intervene. The poor chasseurs didn't counter charge, expecting the dragoons to come to their aid, but because they were left out to dry, they copped the full force of a hussar charge flat-footed and suffered the consequences! The horse gunners on the hill mounted up and buggered off in time to avoid the charging enemy, but abandoned the guns in the process. All in all, not a very promising start!
 |
| Setting up for my flank protection that turned out to be a damp squib |
 |
| Poor old chasseurs cop the full charge while standing still. The guns took a figure off the charging enemy for all the good that did! |
 |
| No guns and no chasseurs! Only an avalanche of KGL horseflesh! |
 |
| Je veux ma maman!!! |
 |
| Ich liebe den Geruch von Blut Französisch in den Morgen! |
 |
| Huzzah! |
But with the main French body entering the field, things looked like they were going to change for the better for the French. I divided my large dragoon regiment into two wings with which to threaten the victorious KGL light dragoons and to screen the remaining British cavalry. An inconclusive cavalry clash occurred in the centre, while Quinny moved an infantry regiment up to protect his KGL cavalry. The British infantry, in turn, were threatened by my dragoon detachment and forced into square. This was my chance, I felt. If I could get my infantry into position I could smash his infantry square with a brigade charge of columns!
 |
| The unstoppable French infantry! |
 |
| Crash... |
 |
| ...and bounce! |
 |
| A nice juicy square... |
 |
| ...ripe for plucking by the infantry! |
 |
| I didn't have enough movement to be able to get into the KGL cavalry's flank, unfortunately. |
 |
| The regiment facing them still treated them with caution, though! |
 |
| The square just tantalizingly out of reach |
I planned on the left flank brigade to hold any advance while the right flank did the heavy lifting. On the right, I had Portuguese Cacadores and the 95th Rifles holding me up, while cavalry threatened my flank. I wanted to contain this threat before anything happened in the centre. With 2 battalions in square to counter the cavalry threat and to absorb the skirmishers' fire, I hoped that the remaining 3 would be able to take on the Cacadores. Quinny, being the aggressive player he is, didn't sit around waiting for me, but advanced the Cacadores in line and declared a firefight. If it wasn't already clear that the dice were on his side it soon became fairly obvious! He hammered my battalions which lost the maximum number of casualties possible, while my shooting left a lot to be desired! At least I survived the resulting compulsory morale test at the end of the firefight, and managed to get one of the battalions onto the Cacadores' flank.
 |
| The left hand brigade approaches the woods and fields |
 |
| The KGL react to their recall... |
 |
| ...to be replaced by Cacadores, Rifles and Hussars! |
 |
| Two battalions are forced into square while the other two attempt to close in with the cacadores. |
 |
| The rest of the division approach the hill, with the light infantry moving ahead to flank the cacaodores. My nemesis, the KGL dragoons remain unformed in the background |
 |
| I come off second best in the firefight with the cacadores |
While I was dealing with the right flank in preparation for an attack in the centre, Quinny launched another cavalry charge at my centre, and this time there was no mistake. He'd attached his general and got his dice nicely warmed up, not to mention the fact that I had taken casualties in the last combat that made it difficult to win next time. Not impossible odds, but I wasn't reckoning on my opponent's influence with the dice gods.
In our game, after declaring a charge, the players have to carry out a pre-melee morale check to see if the charge goes ahead. The higher the roll on a d6, the better. After the pre-melee comes the melee, when again a d6 is rolled with the higher number the better. If a unit suffers a flank attack, or loses a certain percentage of casualties etc, it must take a morale test to see if it stays in the fight or breaks/retreats/retires. In this case the lower the roll on a d6 the better. Needless to say, Quinny was rolling high when he needed high rolls and rolling low when he needed low, while I suffered the opposite effect; I was rolling high when I wanted low rolls and low when I wanted high. For instance, in the following cavalry clash, if I'd managed to roll well and Quinny not so well, I could have eked out a draw, but Quinny rolls a 6 and I roll a 1 in what turned out to be a fairly consistent pattern. The dragoons were smashed and fled to the edge of the board and refused to be rallied next turn, exposing the foot battery who took to their heels to join their mounted colleagues in skulking behind the lines.
 |
| The second cavalry clash in the centre does not follow the pattern set by the first! |
 |
| The British hussars clear the path in front of them. |
 |
| The rear area skulkers! |
Meanwhile, Quinny had managed to extricate his infantry square under cover of the cavalry charge in the centre. He had also reformed the KGL light dragoons after their recall and hid them from my troops' view behind the fold of the hill. In a move I regretted bitterly, I neglected to form my battalions in closed column, as they should have known that there was cavalry somewhere behind the hill, even if they couldn't see it. I was too eager to get at the flank of the cacadores.
 |
| The light battalion in big trouble! |
 |
| With my cavalry cover gone in the centre... |
 |
| ...my troops found themselves feeling a little exposed! |
On the left flank, more riflemen and Cacadores confronted me, but I wasn't going to cross all the terrain and cop all the disorders with it. I detached my elite companies instead, to deal with the pesky Grasshoppers.
 |
| Skirmishers ahead, mon Capitaine! |
 |
| Frenchies ahead, Atkins! |
 |
| Time to send in the elites! |
Finally, I managed to manoeuvre onto the Cacadores flank and pour a flank shot in to discomfort them I was hoping to inflict a casualty at least. Forcing a failed morale test would have been a bonus, but what did I roll? Yes, a big fat 0! The only benefit of rolling a 0 is that it allows the possibility of inflicting wounds or death on an attached general. Did I? Well, what do you think? No!
Quinny shrugged off the resulting morale test like my flank shot was the buzzing of an annoying insect, damn him!
 |
| Quick! Fire on his flank before it's too late! |
 |
| With enemy troops to the front and flank, the Portuguese should have been forced back... |
 |
| ...but not with shooting like that! |
A piece of luck went my way in that I rolled for my rearguard to arrive before Quinny did. Not that it did me a jot of good, mind you.
I was looking forward to sweeping up his skirmishers and careening into his cavalry, followed up by a mass of infantry to roll over any survivors. Aaaah, fantasies are nice to cherish before cold hard reality smacks you around the head with a cricket bat!
 |
| The rear-guard enter the board! |
 |
| What a sight! Surely things can't go wrong? |
 |
Time to tip the balance in the Emperor's favour!
|
 |
| The KGL light dragoons have another idea, though! |
After he successfully withdrew his infantry square from danger, it was time for the KGL lights to save the day. They launched a charge up over the hill at my infantry who were caught napping. The lead battalion was a light infantry battalion which had the general attached in the vain hope that he would make the attempt at forming square that much easier. It wasn't. The light infantry barely acted as a speed hump as the KGL cavalry proceeded to wipe out the better part of a division. Once one battalion breaks, it's very hard for the others to survive a rampant cavalry charge following up on a victory. My division melted away like snow in spring, failing the divisional morale check Quinny requested of me.
 |
| The British infantry, having extricated themselves from their exposed position in square on the hill... |
 |
| ...are confident in the outcome of the battle in their favour. |
 |
| The hussars extricate themselves from the danger posed by my rearguard... |
 |
| ...while the KGL light dragoons do what they do best: Kill Frenchmen! |
 |
| RUN AWAY!!!!!!!!!!!! |
 |
| The KGL careen into my dragoons who are caught flat-footed. |
 |
| Quinny rolls 6... |
 |
| ...while I roll...1! |
 |
| The fourth infantry battalion gets what-for... |
 |
| ...while the last battalion just manages to stay outside beyond the reach of the equine juggernaut. Look at all that empty space! |
The rear guard then entered the fray, manfully shouldering their way through the screaming rabble that was their fleeing compatriots. Were they dismayed? No! (...well, maybe just a little bit.)
The gunners managed to regain their guns and open up on the enemy. The foot guns actually gave some good service inflicting some damage on the large British formations.
My cavalry engaged the British hussars who were covering the withdrawal of the triumphant KGL LD who had responded to their recall orders. My hussars were worsted by their British counterparts, but the chasseurs then fell on the blown British cavalry from outside their charge arc and caught them flat-footed. My best result for the day saw the British cavalry forced to retreat! Huzzah!
But by then the writing was on the wall with Quinny's rearguard entering the board. After greatly outnumbering him, he now outnumbered me, and the quality of his troops were superior to mine. It was only a matter of time.
 |
| Boldly (but stupidly) the rearguard advance to cover the retreat of their comrades |
 |
| The gunners take the opportunity to reman the guns |
 |
| The inconclusive skirmish combat continues on the left. |
 |
| Now all hope is extinguished as Quinny's rearguard arrives. |
 |
| Another isolated square presents a juicy target |
 |
| The gunners start earning their wages. |
 |
| Hussars vs. hussars. Huzzah! |
 |
| British infantry arrive to support the square. |
 |
| The chasseurs cover themselves in glory... |
 |
| ...and see off those pesky KGL cavalry! |
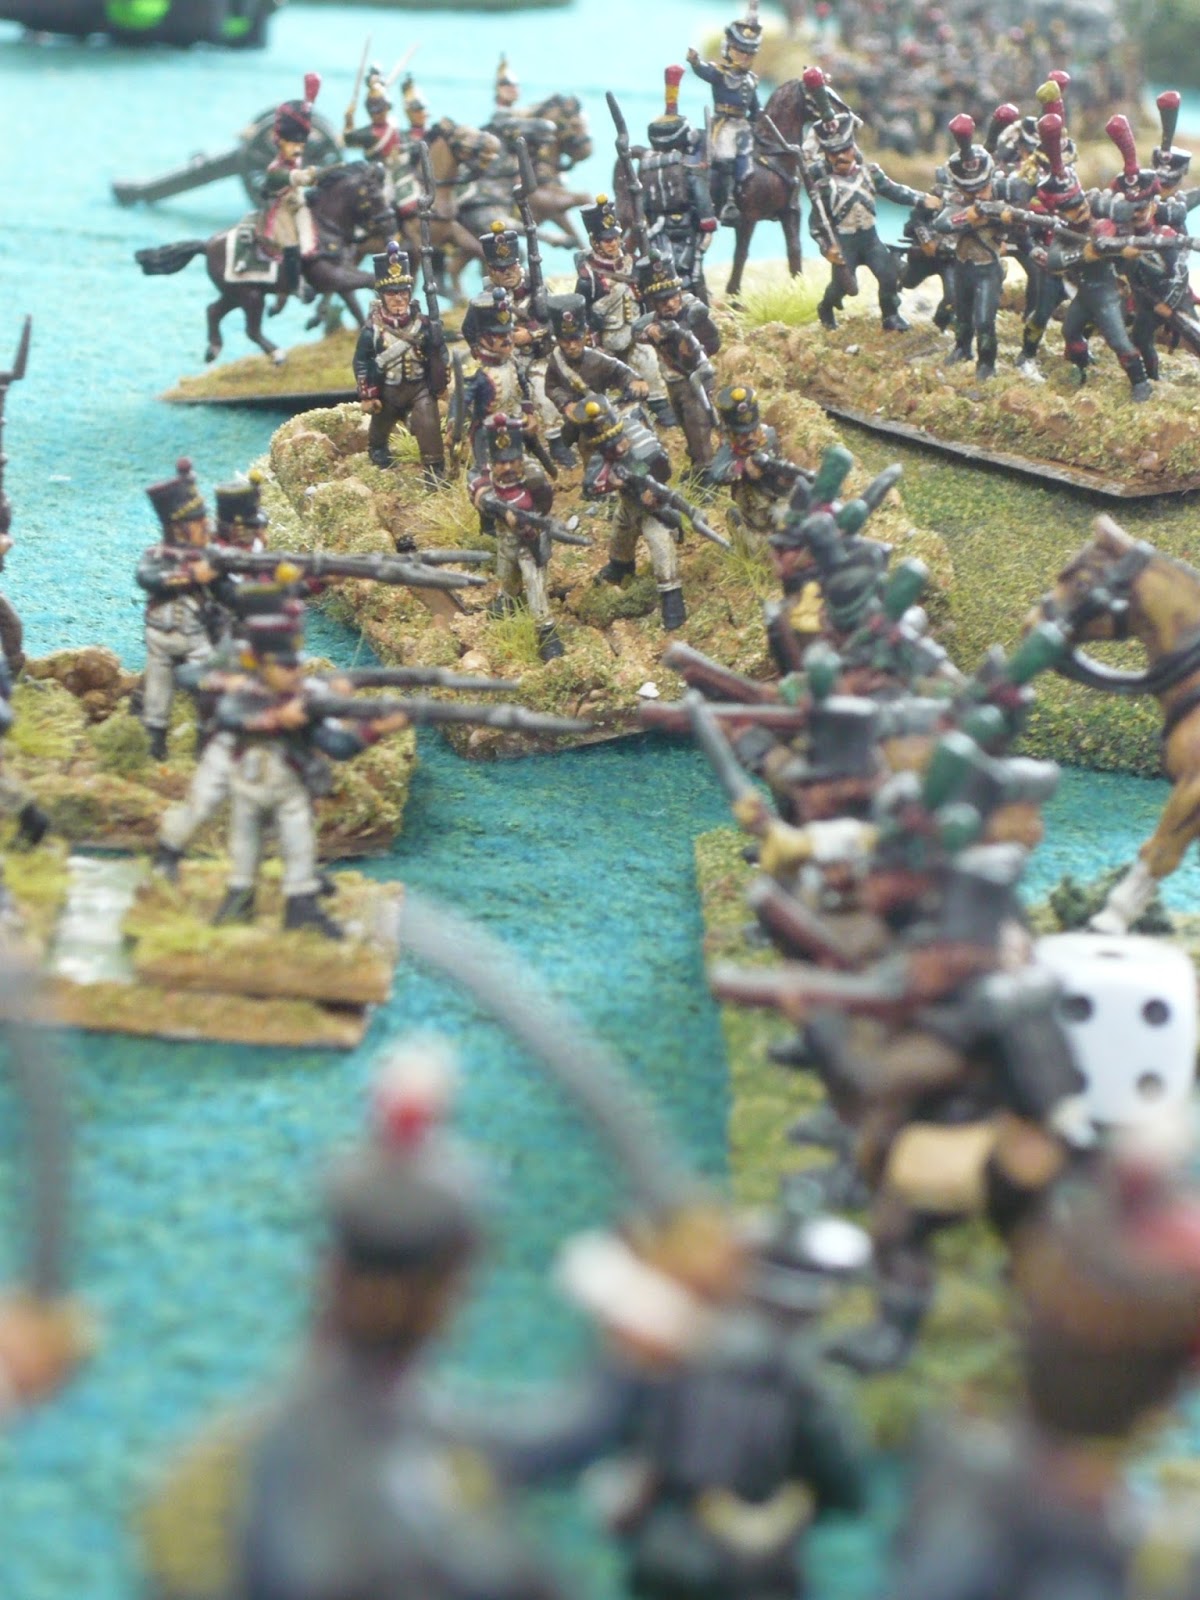
Besides the legendary chasseurs' combat, any offensive action I committed to seemed to be doomed to failure; an infantry charge on a square is usually a foregone conclusion, but I managed to cock that up. Quinny became so reckless he charged one of my battalions in column, which is something you usually never do with British troops. Not only did he do that, but he got away with it, the git! Shows you how cocky he was and how much the dice were running hot for him and cold for me. He anticipated that the trend would continue and was correct!
 |
| My poor excuse of a charge couldn't make a dent in the square! |
 |
| The battalion which had occupied the village exits into the woods in preparation to join the rest of the brigade... |
 |
| ... but the huge British line swings like a gate to pour in fire on the hapless French flank! |
 |
| Quinny had a 10% chance of causing an extra casualty. Does he get that chance? Of course he does! |
 |
| The gunners flee again... |
 |
| ...as they have a sever allergy to horse flesh! |
 |
| My puny infantry forces on the right have their work cut out for them as more British reinforcements approach |
 |
| Quinny cockily marches up to my chasseurs in closed column and gives them some lead... |
 |
| ...and charges one of my battalions. If I'd fired instead of counter-charged, I may have knocked of the head of the column, but with my dice rolling I felt I had a better chance in charging instead. |
 |
| Except my lily-livered lot lost their bottle and halted at 2" with 2 disorders to receive the full force of the enemy charge! |
 |
| Time for the hussars to show what they're made of! |
 |
| They charged the column to their front, which coolly formed square to repel the attack. |
 |
| Meanwhile, on the right, another charge against British infantry in column, with a flank shot on the British as they approached... |
 |
| ... resulted in nothing more than a draw. |
 |
| After copping casualties from flank fire and failing the resulting morale test, the hussars were put to flight... |
 |
| ...shortly followed by the chasseurs! |
 |
| Overwhelming force applied to my remaining battalions on the right flank spelled doom to the French and the game was declared a victory for perfidious Albion! |
Quinny's remark that I should dispose of my dice in the nearest body of water on the trip home wasn't such a bad idea, but his proposed reward for his own dice bordered on the unnatural! Eeeeeww!


Very nice! A great battle, with lot of cavaleries and moves...I do like the "Je veux ma maman!!!" passage!
ReplyDeletePhil.
looking great, managed to arrange for tomorrow so some inspiration thanks!
ReplyDeleteGreat looking battle there Rosbif and the Dice Gods are fickle
ReplyDeleteFantastic batrep Ben!! Looks like you've taken a leaf out of Reject PoorLee book, with those dreadful die rolls!!!
ReplyDeleteWow... what a bloody encounter.... When I saw your infantry in their sabots, I figured that it was an amphibious assault.... Seriously again, it seems to have been a very rewarding game
ReplyDeleteRegards
Rafa
Fantastic looking game Rosbif!! Great report!
ReplyDeleteSounds like a gripping game, and there's some good looking miniatures on the table. A fun read, thanks.
ReplyDeleteFMB
The report was fun, while the game was not; for you at least!
ReplyDelete