The annual highlight of the NWA Napoleonics group (or the big boys' sleep-over, as my family calls it!) occurred the weekend just past down at Drouin in the bucolic surrounds of western Gippsland. Tim and Jill really turned on the weather for us, as it usually is in the high 30's centigrade at this time of year; Friday was very mild (in the low 20's), while Saturday and Sunday got slightly warmer and more humid, but it was still a far cry from the sweat box that is Tim's shed during the real heat!
Jill did her usual sterling job at feeding a horde of middle-aged wannabe Napoleonic generals let off the leash of domesticity for a weekend to gorge themselves at her table. I think we should award her the honorary title of NWA QMG, or at least Cantiniere-in-Chief! Much food was eaten and wine drunk and a merry time had by all. Oh, and a game was played too!
This year the extravaganza was Wagram, 1809, as a companion piece to last year's Aspern-Essling. We decided to start off with the historical dispositions as too much had occurred in last year's game (including Archduke Charles' death!) to be able to continue directly on. Commanders roles changed, too: John R. took on the role of Archduke Charles, while Quinny took the ultimate step away from his usual British tendencies by taking on the role of Bonaparte himself! As regular readers of the blog have seen, I took on the role of Eugene de Beauharnais in command of the Army of Italy.
As anyone with a passing knowledge of the battle knows, the Austrians needed to win the battle to recover Vienna and expel the invaders from the empire. Another close victory like Aspern-Essling might be enough to bring Bonaparte to the negotiating table, but a defeat would be fatal to the Austrian cause. On the other hand, the French needed to win to restore Bonaparte's reputation as a military genius.
Quinny's plan for the game was for the French to fall back, initially, to consolidate the French forces, especially Massena's IV Corps, spread around the western end of the board. Bernadotte's IX Corps was also ordered to withdraw from Aderklaa, so as not to waste energy too far forward which would necessitate reinforcements being deployed early once the Saxons broke (which were sure to do), in a place chosen by the Austrians. Consequently, the first few moves were rearwards as the French and allies consolidated their forces in the west and centre, while the eastern wing held the line and attempted to take the Austrian held villages in front their main line along the Wagram heights. My task, as the pivot point for IX Corps was to conform to their retirement, protecting their right flank as they withdrew, then forming a line from the ridgeline facing the Russbach and the heights, back to Neu Wirthaus. As the Army of Italy was one of the weaker formations, this was always going to stretch my forces. The plan was then for the Guard to come up and replace the IX Corps and advance to the front. Things didn't quite go to plan, though!
As I held the line, I faced Pete E. at Deutsch Wagram with his Austrian I Corps. He had a grand battery set up in front of the town that seemed to consist of only 12lbers, although apparently there were some 6lbers mixed in for good measure. It didn't seem to matter because even at extreme range he seemed to throw exactly the right number to inflict casualties on my line. There was speculation that Pete had sold his soul to the dice gods before the game started! When he didn't throw 1's or 2's he was throwing 0's, which in our rules scores general casualties. Rolling another high number causes the general's death or severe wounding. Pete managed to score 6 French generals' deaths or severe maiming during the weekend and is now known as Pistol Pete! As my batteries were only of 6lber calibre I couldn't even reply to the pounding I was getting, so I had to withdraw as best I could out of range while still conforming to my orders.
Meanwhile, Tim and Andrew S. made their appearances on the board as their respective Corps (the VI and III Corps) drove back Robin's IV Corps. Robin put in a spectacular charge at one stage, with Lasalle at the head, as Tim crept forward, ready to put pressure on Aspern. Robin sent Tim's gunners fleeing in disarray, forcing the escorting Austrian cheveaux leger to counter-charge the French hussars, but failing to stop their triumphant progress. Robin's hussars were eventually shot at in the flank and chased of by more of Tim's cavalry, but they'd done their job by stopping Tim's steady advance in it's tracks. HUZZAH!
Archduke Charles (aka John R.) seemed to be getting a bit antsy in the centre and ordered Pete to charge his cavalry at my guns.Only one of his cavalry brigades was in column, therefore able to reach my line in the same move, but my infantry had plenty of time to square up and see them off with a well aimed volley. His other cavalry were in line and ran out of tape-measure, ending up within close range of my guns which did their worst on the next turn, sending the Austrian cavalry packing.
Meanwhile, Andrew's III Corps were assembling menacingly in front of the Saxons, but angled towards the weak link in the French line; namely ME! I was rescued from having to withstand the concentrated force of one of the stronger Austrian corps by one of those moments in wargaming that throws the game on it's head. In a fortuitous misunderstanding of orders, Paul's II Corps started a flank march in the face of the Austrians on the heights around Baumersdorf. The original orders were apparently only for the corp's artillery, but Paul got the wrong end of the stick and sent his whole corps on a north westerly march waving its flank at the Austrians. Archduke Charles couldn't resist this apparent French fumble and sent past of Hohenzollern's II Corps off the heights to exploit the mistake. Only problem was, there were no more reserves, while the French had the Guard and the the heavy cavalry in reserve.
The II Corps attack was faced by Paul's II Corps which had turned to face the threat. the rest of his Corps were behind the ridge awaiting developments in front of them. My little 3lber horse batteries had trotted up to the front slope of the ridge unable to believe their luck at the nice big juicy flank target in front of them. The Austrian brigades charged the french who in turn counter-charged, but my little pop-guns both scored hits in the Austrian flank ( I rolled a 1 & a 2, thank you very much!)which I like to think tipped the scales against the Austrians, forcing them to halt 2" from the enemy, instead of charging home (They also had formed enemy in the flank which added some extra penalties, too). They were then repulsed in the French counter-charge, and a hole opened up in the Austrian centre exploited by the relieved commander of II Corps with the assistance of the Heavy Cavalry Reserve. By 10pm on the first night (roughly 11am game time), the Austrian centre cracked wide open forcing a concession from our gallant enemy.HUZZAH!
Rather than sit around drinking for the next 2 days (as pleasant as that would have been!), the next day saw us rewind the clock and play from the moment that the Austrian VI & III Corps entered the board, with the French on an all out attack order.
My next post will recount this epic battle where I tried my best to bring MacDonald's giant square into the game!
 |
| Army of Italy's starting blocks |
 |
| The battlefield looking from the east from the heights towards Aspern and the Danube |
 |
| And from the west with the dike and Essling in the foreground |
 |
| The Army of Italy waiting for the morning start |
 |
| The Guard and Heavy Cavalry reserve |
 |
| The Guard and heavies again. A beautiful thing to have just behind you! |
 |
| Enough already! |
 |
| The first move. The Army of Italy leave the starting blocks and advance to cover the withdrawal of the Saxons. |
 |
| First objective taken; the ridge to the front. Now to form line diagonally back to the left. |
 |
| The battlefield from the west with Massena's command scattered all over the field prior to consolidation. |
 |
| IX Corps steadily falling back. |
 |
| Army of Italy covering their right flank as they go. |
 |
| Army of Italy beginning to angle to the left in preparation to cover the front of the retreating Saxons. Just behind the edge of the table is the Guard on a separate table, just ready to be wheeled on if needs be! |
 |
| Robin's heroicc light cavalry commanded by Lasalle, ready for their do-or-die mission. Note the open spaces on the IX Corps left flank! |
 |
| Closer view of Robin's lonely Hussars. |
 |
| Garry's III Corps on the right flank, ready to take Markgrafneuseidel to his front. |
 |
| The Austrians behind the light works on the edge of the heights. |
 |
| More heavy reserve. It's a beautiful sight; what can I say?! |
 |
| The view from the east. |
 |
| The Austrian position from the east. |
 |
| Andrew's III Corps Schwarzenberg Uhlans |
 |
| And here's the rest of III Corps! |
 |
| III Corps takes up its position... |
 |
| ...countered by Bavarian guns... |
 |
| ...and Baden guns and infantry with some further French infantry. |
 |
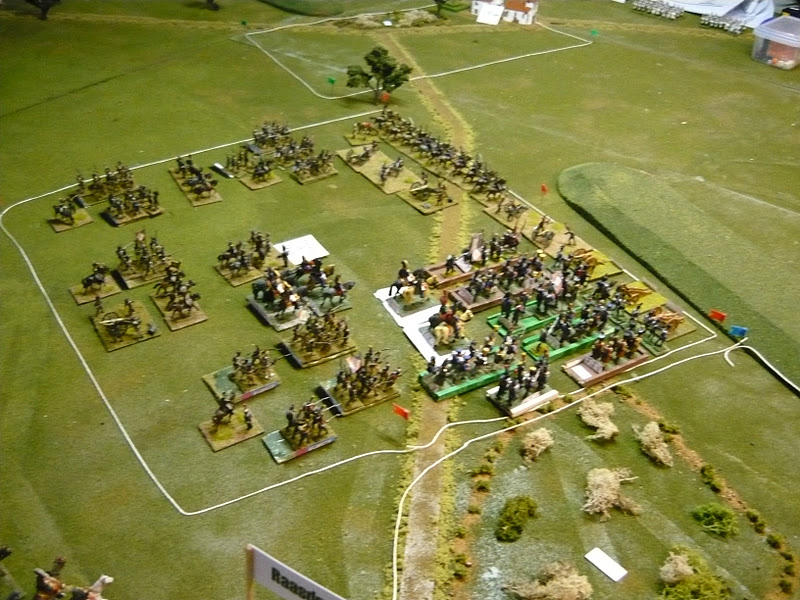
| The Army of Italy in position from the ridge to Neu Wirthaus. |
 |
| All the tables put together looking west. |
 |
| The comforting sight in the Army of Italy's rear; The Guard and Heavy Cav reserve! |
 |
| Look at all those lovely Bearskins! |
 |
| Blunder countered by blunder; II Corps facing the wrong way, but so are the Austrians! My little pop guns place themselves on the forward slope with a lovely flank target in the offing! |
 |
| Pop!Pop! Halt at 2" , then reap the rewards Kaiserliks! |
 |
| During a well earned break we dissect the day's fighting before dinner. |
 |
Team photo.
Standing (l to r): Your humble correspondent, Pistol Pete Ed., Garry.
Back row: Our kind host Tim, Paul (the class clown!), John R.(aka Archduke Charles), Jenko, Malcolm, Darren.
Front row: Andrew S., Robin, Tony, Quinny (aka that Corsican git), Jim. |
 |
| The game continues with the Austrian assault throw back in disarray, with the rest of the attacking force awaiting the next bad news |
 |
| The aerial view of the same scene. Archduke Charles crunching the numbers desperately trying to find a silver lining! |
 |
| Paul follows up his victory, chasing hard on the heels of the vanquished foes, awaiting the arrival of the cuirassiers. |
 |
| Robin's Massena figure. It looks like the driver's done a bunk, knowing that Massena is going to stiff him of his danger money! |
 |
| Andrew S.'s Austrians in a quandry. While the centre has broken, what to do know? |
 |
| Robin's stalwart chaps holding the left flank |
 |
| The cuirassiers crest the ridge to spell doom for the Austrian centre, while Paul's reserves hurry to back up his breakthrough. |
 |
| Essling held by the Badeners of IV Corps. |
 |
| More Badeners in column. |
 |
| IV Corps artillery with Bavarian horse guarding them in the background. |
 |
| Andrew's Austrian cuirassiers behind the infantry. |
 |
| The end is nigh; French cuirassiers approaching the hapless Austrians |
 |
| Runaway, Austrian gunners! |
 |
| Infantry in square, but infantry approach behind the cavalry! |
 |
| On the right flank, Garry moves on the tower north of Markgrafneuseidel... |
 |
| ...but this was his high-water mark as he was bundled off the ridge unceremoniously! |
 |
| Paul's infantry charge the squares; game over! |


Wow! That was an impressive gaming table, with tons of minis. What fun you must have had!
ReplyDeleteFantastic looking table. Love the photos.
ReplyDeleteWhat an epic post!!! and an epic looking game to match, the table looks fantastic as do all the action pics. Nice to put a face to the name!!!
ReplyDeleteOutstanding Sir!
ReplyDeleteThat's great. What a report. Thanks for a very good AAR.
ReplyDeleteExcellent pics and great looking game. Wagram makes a fairly well balanced Wargame, with the edge to the French. Seems like there's another version to come!
ReplyDeleteJust curious if your scenario allowed for the possibility of Archduke John's troops arriving on the field?
Peter
Wow! What a grand spectacle of a game! Good going guys! Dean
ReplyDeleteHi Gonsalvo,
ReplyDeleteI thought Wagram was a fairly evenly matched battle as well - until we fought the battle. When we converted maps and OBs to figures and a battlefield we saw a different reality. The Austrians did not have a hope in hell unless the French were very stupid and made big mistakes.
IV Korps on the Austrian left could not hold out all day against the French III corps until Archduke John arrived.
On the right the Austrian III and VI Korps were not up to the task. Too weak in infantry to attack for any length of time.
And the Austrians had no reserve. Once a Korps cracked the line was broken and the battle was over.
In the game design we allowed for Archduke John to arrive but the battle was well and truly over before he was due to make an appearance.
Tim