Now that I've got the Dennewitz AAR out of the way, I've got the time to document my first outing at the club two Saturdays ago. I got to christen my Croats and the Schilling French infantry (more on that later!).
I was partnering Paul (once he turned up!) with our French against Andrew S., my nemesis from Dennewitz, and Tony, who fronted up with Austrians and Prussians respectively. It was a matter of quality over quantity for me, as I fielded the Conscripts of the Guard on their maiden outing, along with the Croats (rated as Veteran) as well as the Schilling French infantry (also Veteran). The rest of the infantry were rated as regulars, except for my Velites of the Guard, which were rated Elite, and a battalion of light infantry (Veteran). I made up the numbers with French a light cavalry brigade and a regiment of Italian dragoons to protect the flanks, and a battery each of horse and foot guns.
It was a tough game of swings and roundabouts, with the advantage going from one side to the other. I was lucky early on as I don't play cavalry well as a rule, and this game was no exception, so my ham-fisted cavalry generalship should have benefited Andrew more than it did! As it turned out, he had his luck with the dice on the crucial infantry charge when I flubbed my counter-charge of the Italian Guard (more on that later).
On the other side, Paul managed to hold up the Franco-Allied side by forcing back Tony's Prussian's, retrieving some glory from the day!
 |
| My initial set up |
 |
| The Schilling French on debut! 1st battalion... |
 |
| ...and second btn. |
 |
| The Italian Guard; Velites to the foreground and Conscripts to the rear |
 |
| The 2 Croat battalions on debut |
 |
| Paul's French |
 |
| Tony's Prussians |
 |
| Andrew's Austrians (you get a lot for 1500 points, don't you?!) |
 |
| I secured the initiative and seized the hill, while Andrew aimed for the pinch-point between hill and woods. |
 |
| On the centre flank the Italian Dragoons and Austian Dragoons face off, with Polish Lancers in the background. |
 |
| My Chasseurs move around the left, while the Hussars are wasted in dead ground backing up the artillery. |
 |
| 1st clash! My Chasseurs charge Andrew's advancing closed column, stopping his infantry advance in its tracks... |
 |
| ...but I'm charged next turn by his Hussars. Caught flat-footed, blown and with 2 disorders, I was lucky only to be forced to retreat. |
 |
| The Austrian Hussars continued on, crashing into my poorly positioned hussars, who were spanked for their trouble, and continued on into the infantry! |
 |
| The die indicates where the Hussars' breakthrough move would have ended. Both infantry battalions in their path failed to form square! Luckily, the one partially out of the frame to the left did and poured in flank fire on the charging cavalry... |
 |
| ...which caused them to fail their resulting morale test and retreat with losses. Phew! |
 |
| After that bit of a heart-starter, I manage to pull my line on the hill together... |
 |
| ...while to the centre, my forces stay behind the guns and await developments. Unfortunately, my dragoons are standing out in the open with a big 'Kick Me' sign around their necks, rather than sensibly being tucked out of the way to offer a potential threat. |
 |
| So the inevitable happens: They are charged first by the Austrian dragoons, which my dragoons are able to see off... |
 |
| ...then by the Polish Lancers, who they also see off, despite being blown and having a disorder... |
 |
| ...but then are fired on at close range by artillery! |
 |
| Run away! |
 |
| What I should have done earlier! The light infantry move through the woods to attempt to get into the artillery's flank. Andrew counter-moves by bringing an infantry battalion to shield the artillery. |
 |
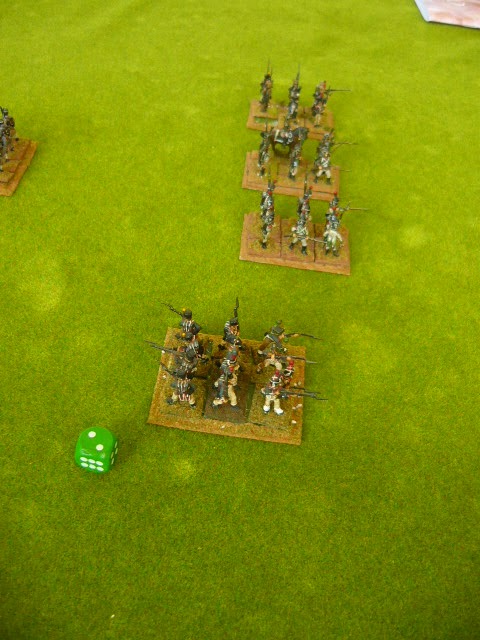
| My Italians and Croats on the hill preparing to attack the conscripts and landwehr in front of them... |
 |
| ...while my reserves hold the right flank. |
 |
| Tony's Prussians advance on Paul. |
 |
| Andrew's Austrians |
 |
| Andrew falls back, but triggers an opportunity charge by the Little Engine That Could, my Chasseurs! |
 |
| His infantry flee, leaving a nice juicy infantry target! |
 |
| The situation from a bird's eye view; I was yet to spot the threat from his 2 grenadier battalions directly above the hill, behind the artillery! |
 |
| Meanwhile, on the centre flank, Andrew sends a lonely battalion on a fishing expedition. My Hussars have recovered and have been sent to the right to fill in the gap caused by the rout of my Dragoons. |
 |
| Another aiborne view; this time I've noticed the threat in the centre and moved part of the reserve forward. |
 |
| Hussars in column charge the advancing infantry... |
 |
| ...and send them on their way. Those Polish lancers look rather ominous now, though! |
 |
| Blooded! The Schilling infantry take their first casualty. |
 |
| The Austrian Grenadiers charge up the hill from behind the guns, met in counter charge by the Italian Guard units and one of the French Veteran units... |
 |
| ...who promptly flub the pre-melee morale test and flee in panic, before even making contact! GRRRR! |
 |
| The red marker indicates the Grenadiers' breakthrough. Guess what happens next? |
 |
| RUN AWAAAAAAAY!!!! |
 |
| A big gap opens on the hill, with the last remaining Croat battalion about to get dished up. |
 |
| The Italian infantry become the hunted instead of the hunters! |
 |
| Some little revenge was extracted, though; one of my remaining French Regular battalions gave the closest Grenadier battalion some flank fire which caused them the retreat. |
 |
| My gallant Chasseurs try to pull something out of the hat by charging the nearest Austrian unit , but both cavalry and infantry fail their pre-melee and just stand there wetting themselves! |
 |
| The situation as it stands. A dirty big hole in my centre which nothing can repair! |
 |
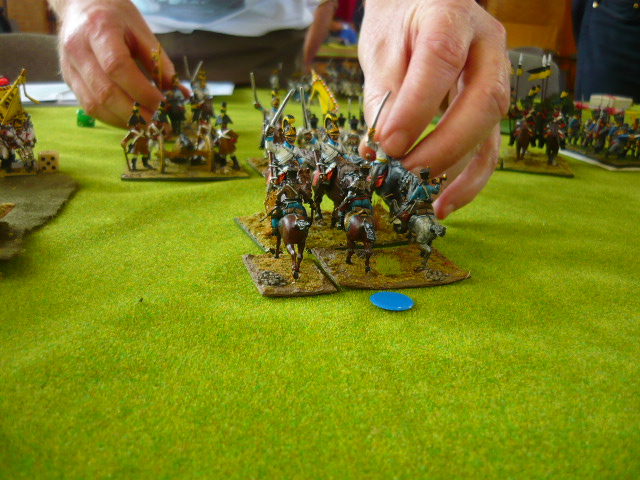
| One last hurrah on the other flank; Andrew's Dragoons charge my blown Hussars, which rout to the rear... |
 |
| leaving the way open for the Lancers to charge my infantry in closed column. They resist the cavalry, but with infantry moving around behind the cavalry, the end is nigh! |


What a feast for our eyes!! A great looking game Ben, it all to be going quite well until that 1.
ReplyDeleteExcellent looking game. What rules were used?
ReplyDeleteSteve
We use our own club rules called Cold Steel. See the link below the blog header for details.
DeleteThanks for that. I'll be giving those a read through.
DeleteSteve
What a great game and lovely photos to boot there Rosbif.
ReplyDeleteLooks like an awesome game Rosbif! Beautiful troops.
ReplyDeleteFor the first game of the year, this is a great, great report...May be because this was my first army, a long time ago, but I find your Italians absoltly wonderful! Prussians too! In fact, all is great!
ReplyDeletePhil.
Fabulous game with great looking figures. Best, Dean
ReplyDeleteA cracking start to the year Sir.
ReplyDeleteNewly painted units always run in the first game-with so many newbies you held out well! Great report.
ReplyDeleteGreat game and AAR - lots of really nice crisp photos of your great figures.
ReplyDeleteCheers,
Doc