Pages

Monday, May 30, 2011

New WIP - Spanish Infanteria Ligera, French Command and dragoon

I missed out on the last game of our long-delayed Iberian Campaign played last Saturday due to sick kids and working wife, but after sending General Hill and a force made up of mainly KGL infantry and cavalry around the southern flank, across the Tagus and into the French rear, while my main force that had received the spanking in the first battle maintained its position, my deputies (Quinny and Andrew B) apparently put in a sterling performance and drove Tim and Robin away from Toledo. Huzzah! 

I'll be getting an AAR with photos, so stay tuned! I'll have to work out what to do next depending on the severity of Tim's defeat, but I know that the other French players are advancing from the north and south, so I may have to scoot to avoid encirclement.

Anyway, I put my enforced inactivity to good use over the last week. I've made headway on my command stand using the ADC figure from the last posting, as well as an eagle-bearer dragoon figure and a couple of units of Spanish light infantry. 

The HaT Spanish Guerrilla kit includes figures that can conceivably be painted as any line unit, but one set of figures is clad in a unique uniform that can only be the one regiment; the Infantería Ligera de los Voluntarios del Reino de Valencia (volunteer light infantry of the kingdom of Valencia). Probably unique in that it was a non-Scottish Highland regiment which wore kilts! Above the waist, they wore fairly standard early 19th c uniform of shako with plume and cords, blue tunic with collar and cuffs in the facing colour of red (with the exception of a unique cross-hatched shoulder decoration in lieu of epaulets)and the usual Spanish paraphernalia like backpack, and belly cartridge belt/box. Below the waist, they wore the white kilt and leggings with espadrilles, in the local style. As to where they were deployed and which army the belonged to and their campaign history, I have no idea! If anyone out there can shed some light on this I'd be grateful. The ever helpful Rafa Pardo has kindly given me some images of Spanish uniforms, one of which you can see below, but the text is in Spanish and seems to be limited to only describing the uniform. Anyway, they're the perfect unit to add little colour to my weekend games!

I've also launched a mass head swap using tarleton heads from the HaT British rocket troop set to replace the topper wearing heads of the Spanish line troops from the same set to create another unit of Spanish light troops. There's a great book in the collection at work,  Armies of the Napoleonic Wars: An illustrated history by Chris McNab , which has a great chapter on Spanish uniforms including the tarleton wearing chaps I'm trying to replicate, but do you think I can find it? No! Bloody students; shouldn't be allowed to use books on my pet topic! I'll have to wait until it surfaces to find a picture to base this lot on.

Also included below are the command stand I've been working on including the ADC from the previous posting and a general and light infantryman as horse-holder. I held the last figure under hot water and manipulated his arm so that stayed bent once it cooled to look like he's holding the reins. I also chopped up a spare artillery wheel to add a little atmosphere to the diorama.

The last is the eagle bearing dragoon figure that I converted using a length of wire, a spare eagle from the Italeri infantry set and a tiny blob of Miliput to construct a thumb to make it look like he's actually gripping the staff. The original figure was holding a musket, which I chopped away, but after gluing the staff, I didn't like the way the staff looked stuck to his hand, so with the tiniest amount of Miliput and a lot of patience, I sculpted his thumb and palm. I'm quite proud of the result!


The first 4 Valencian light infantrymen

Illustration from 'Uniformes Españoles de la Guerra de Independencia' by José Maria Bueno Carrera, Aldaba Militaria (1989) as provided by Rafael Pardo.

Advancing figure

Firing figure. Note the espadrilles!
Tarleton wearing Infanteria Ligera conversion
Command figures and decoration added to prepared base

Flocked and varnished

Eagle bearer dragoon conversion with added thumb!

Friday, May 27, 2011

Italian Dragoons of the Guard & other stuff

I've finally finished the Dragoons of the Guard for the Wagram project. All troopers have had dragoon muskets added in a fiddly procedure, but I think it adds a little realism to the figures that was lacking. The horses aren't the original ones that came with the kit but I think they are better as they aren't posed in the flat out charge of the originals that cavalry really didn't engage in very often. These horses look like they're charging at a more sedate trot or canter.

I've also finished a few Spanish guerrillas, from HaT's Spanish Guerrilla set, to add to my Spanish forces, including my favourite: monk with blunderbuss and crucifix!

Also included are pictures of the ADC figure from a new French command vignette I'm making. The stand will have the general making sure the ADC has his orders straight, while the ADC is in the act of making for his horse which is being held by the reins by a light infantry chasseur. The figure has a head swap using the Lancier Bleu cylindrical shako head, as the original Italeri figure's head had a shako much too short, more like a kepi, which didn't look nearly as good.

Italian Dragoons of the Guard in column
The command figures
Troopers
My band of desperados
Piratical looking guerrilliero
Wouldn't want to bump into him in a dark alley!
Father Francisco can give you the last rites before killing you!
Ninja-guerrilla

Topper-wearing chap
ADC ready for action
Who's a pretty boy, then?

Thursday, May 26, 2011

2 Battles, 2 Victories! #2

After my famous victory on Friday night, the parliament offered a vote of thanks and the king knighted and ennobled me, so that I am now known as Sir Loin of Beef, Duke of Porterhouse. Huzzah!

I followed this victory with another on Sunday, held at Chez Rosbif against Geoff D, a workmate getting back into Napoleonics. The dining room table was taken over, terrain thrown on and armies laid out and initiative rolled for. I won that, too!

I had basically the same army that I used on Friday night but this time with extra added goodness of riflemen! Yum! I had made 2 army lists of 1240 points each, using my figures, so that I could use my riflemen and all my Spanish, and Geoff could use the dragoons and chasseurs plus all the infantry at regular or above.

Again I moved forward to a defensible position between a walled field on the left and a wooded area on the right, and formed a combination of line and column, with a substantial reserve, that worked so well on Friday night. Geoff moved his forces forward in 3 infantry brigades with his artillery in the centre accomapanied by the chasseurs in line while the dragoons were with the light infantry brigade on his right. He set his foot artillery on the heights, but they were firing at extreme long range so didn't really play much of a factor.

My light dragoons were posted on my far left and in the centre, behind the Spanish gun battery and were both put into good use through the course of the game.
 
Geoff moved his light infantry up to the walled field, but the far battalion advanced without adopting an anti-cavalry formation and were opportunity charged, as they began a movement within the 12" arc. They couldn't form square in time and were forced to retreat. That left my dragoons able to turn around and form line in their next move, threatening the other battalions, who couldn't move without triggering another opportunity charge. The RHA battery pinged away across the field wall at the French before my dragoons charged the flank of the nearest column, completely smashing it. The normal post victory movement brought the cavalry into the flank of the battalion arrayed in line, so another melee was fought, with another smashing victory the result. This victory then resulted in my dragoons going battle-mad and sent them careening into the flank of the French dragoons who by now were placed in line on the crest of the hill, sending them reeling down the reverse slope. My victorious journey was stopped when the infantry battalion behind managed to form square and send the cavalry reeling back. they were finally sent packing when both batteries of artillery opened up knocking off 2 figures and resulting in a failed morale check that sent them reeling. Their job was well done, though and that flank was never in any danger for the rest of the game.

While all this was happening, Geoff moved up the battalions facing my right flank, so I move one of my British reserve battalions through the wood to line up on the extreme right flank, while my riflemen added a couple of disorders to his columns. He detached some voltiguers and in the ensuing skirmish combat honours were about equal. He also launched his chasseurs against my Spanish anchored line, even though I informed him that is was an effective anti-cavalry formation. I think he didn't expect the Walloons to be as tough a nut to crack as they were. His chasseurs then halted 2" from the line after failing to charge home due to the effect of my firepower, leaving them to be devastated in the volley that followed in my turn.

Geoff sent another infantry battalion through the field in the centre which deployed in line. It copped some fire from the Spanish guns and lost a figure, but it was the charge by the other squadron of dragoons that put it to flight. The light dragoons barreled through the unlimbered Spanish battery, smashed the battalion in line and caused the horse gunners to flee their guns for the nearest infantry square, which repulsed the light dragoons back to the crest of the hill. Geoff then tried to retrieve something on my right flank and put a charge in with 2 columns on the extreme right battalion resulting in a draw and allunits retiring. This left a space for the Portuguese to then maneuver onto the flank of one of the unsuccessful French columns to threaten them and to protect the highlanders' flank as the whole right flank advanced.

Geoff tried to stop me by then charging 2 columns across the fields at the highlanders, but were stopped in their tracks by a combination of disorders from the charge through the field and the firepower unleashed by the line. The French turned and fled and the game was declared another British and allied victory. Huzzah!

The French advance
And on they come
The British and their allies form up between woods and fields
The allies from the left flank
Occupying the ridge
The Spanish anchored line, guns and lurking light dragoons in reserve
The British reserve moves up in support
92nd Gordon Highlanders waiting in line with Portuguese in column protecting their flank
Skirmishing in the field. Riflemen knock off a Frenchie!
Geoff's columns advance on my right, copping a disorder on the way.
A reserve battalion deploys in line on the right.
The lt. dragoons charge the careless French legere...
...and send them reeling...
...then deploy in line and turn...
...to charge the remaining column in the flank, breaking them and carrying on into the rear of the line, which also are smashed...

...then after going battlemad, carry on into the flank of the stationary French dragoons..
...and are finally brought to a halt by the infantry who form square in the nick of time.

The French artillery then focus their attention to the cavalry threat...

...and repulse them to where they started from minus a figure or 2.  Job well done, boys!
Geoff's ill-fated charge against the Spanish line goes in. He wasn't expecting Spanish guardsmen to be much chop!
After halting 2 inches from the line, the chasseurs then get the full benefit of line fire at close range. Ouch!
My other light dragoons decide their comrades aren't going to hog all the glory and charge the line in the field...

...sending them packing and carrying on to the horse gunners, who are facing the wrong way. They fled to the protection of the square.
Geoff's attempt at a breakthrough on the extreme right.
The situation with the right flank moving forward, the unsuccessful French charge on the right contained by the Portuguese column, and my cavalry still advanced before losing out to the square.
The cavalry have returned and Geoff is about to launch the 2 battalions near the village across the field to their doom.


Wednesday, May 25, 2011

2 Battles, 2 Victories! #1

I've finally worked out why my victory-to-loss ratio is so uneven: My opponents have always had figures of a larger scale than mine! I just can't compete against the 28mm, or even 25mm, figures that predominate at the club. Last Friday night and Sunday I played games against opponents using a matching 1/72nd scale army and won both games; ergo, the scale factor must be the answer!

Seriously though, I played 2 opponents whose grasp of the rules was weaker than mine; Ian on Friday night was returning to the rules after not having played for a couple of years, and on Sunday Geoff D, a mate from work, came over to Chez Rosbif and took part in an introduction to our club rules (see the next post for details). Previously, he'd been in charge of a Russian grand battery in his only other foray into Cold Steel. I also took guru Andrew B's advice and kept a decent reserve in hand, only using the cavalry in situations to my advantage.

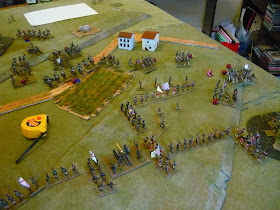
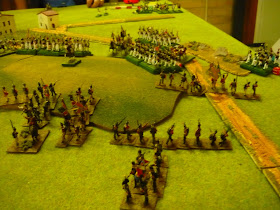
Friday night's game started off with me deploying my army across the field in a mix of line and column with a reserve of 3 British line battalions in column and line and the cavalry and RHA battery. The Spanish held the left flank with the Walloon Guards in line flanked by 2 weaker line battalions in column on the line's flanks. Another Spanish battalion stood in reserve. The Spaniards were flanked by their 9lb foot artillery battery to the right, then came the British with the 92nd Highlanders in line, Portuguese in column, the British light battalion in line flanked by a 2nd Portuguese column. In reserve were the 3 British  line battalions and the cavalry. I moved everything forward to a line between the walled field and the rough ground on the right, then sat and waited for the French.

Ian moved his light troops in skirmish order towards the Spaniards in front of a battery of horse artillery and a column of Chasseurs-a-Cheval. Ian's main force advanced in the centre and his left, accompanied by Hussars and another squadron of Chasseurs-a-Cheval.

I countered the threat to my left flank represented by the cloud of skirmishers and the cavalry and horse artillery, by charging my light dragoonsin cloumn down that flank. His skirmishers fled to the cover of the woods, but interfered with his chasseurs' counter-charge, giving them 3 disorders before he came into contact. The result was a smashing victory to me! Needless to say, his limbered horse battery hightailed it to the rear with the British cavalry in pursuit. That left my dragoons in an awkward position with large numbers of French light infantry on their flank, one battalion of which formed up in line on the dragoons' right flank. I continued to chase the guns in order to neutralise the threat they posed, and I thought that I was to be fired on in the flank, it might as well be for advancing, rather than retreating. I survived the flank fire and continued the charge next turn to chase the horse guns, which continued to flee away. The light troops hustled after the dragoons, formed in their rear and blasted them, which caused them to break. By this time they were well in the French rear, so I thought I'd be able to use this to my advantage, but the horse guns exacted their revenge by unlimbering and firing into the dragoons' rear again, totally destroying them. This was well worth it as they'd totally disrupted the combined-arms attack developing on that flank.

Meanwhile, on my right flank, a regimemt of line infantry came across the rough ground. They were followed on their right flank by the hussars. I squared up my Portuguese on that flank to deal with the cavalry threat to the line, and brought up the nearest British line unit in line to counter the threat. The battery of RHA guns also deployed to catch the nearest French battalion in the flank. I launched the other squadron of light dragoons through the unlimbered Spanish artillery battery at Ian's extreme right line column, but he managed to form square just in the nick of time, resulting in the repulse of my cavalry (in a fog of war moment my cavalry retreated when the worst they could have suffered was a retire).There then occurred some jockeying for position, before Ian launched a charge from the rough terrain, which I thought wouldn't be successful because of the disorders. Unfortunately, it was successful! His 2 battalions crashed through the Portuguese square and on into the flank of the light infantry line, forcing both into retreat. With this threat to my right flank, things looked shaky, as the line was broken and even though the Highlander battalion had the other Portuguese column on its flank, their flank was still exposed. Ian moved his victorious battalions through 90 degrees to protect his flanks, suffering a flank shot but surviving the morale check. They now faced my lonely line although the 2 retreating battalions  would turn around next turn, and I still had another battalion in reserve.

Ian then charged his hussars at the 2nd Portuguese closed columnwhich was forced to retire in a close combat. This now left the highlander line exposed in the centre, and when Ian then moved his Chasseurs-a-Cheval closer, he spooked the Scots into square, which is just what he was after as he then launched his 3 right hand line battalions straight at my highland square, obliterating it and leaving a tartan squidge on the ground where the square had been! This is where observers shook their heads and tutted, "Poor Ben; he's done it again" (Not singling anyone out, eh Robin?!). I could still see I had several untouched battalions in reserve and that Ian had no real backup to exploit his success. My right flank was still a bit of a mess, but I had enough troops there to be able to hold any push (hopefully!) and I attempted to draw back to reorganise some sort of defensive line. Ian put in a charge by an isolated French battalion at my battalion in line, but he was repulsed by the firepower of the line; always charge a British line with more than 1 battalion!

Meanwhile the Spaniards in the wheatfield had held their line against the French light infantry. A charge through the field was met by the Walloon Guards and resulted in a stalemate with both sides retiring. A similar occurence happened when another French battalion in line charged a much weaker Spanish battalion in column on the extreme left flank; both sides bouncing, proabaly the best reult I could have asked for. My Spanish artillery pivoted to take the French light in the field in the flank, but this exposed its own flank, inviting a charge by the French. The gunners did a very un-Spanish thing and fled their guns, rather than defending them to the death as they would probably have done in reality, but I hoped for them to live to fight another day! (This added to the highlanders' exposure and added to the calamity when they were broken.) After the French breakthrough in the middle, the way was opened up for the Spanish to maneuver a bit more, especially with the British battalion on that flank covering the Spanish right by forming square against the approaching chasseurs. Another charge through the field on the Walloons ended in dismal failure as their firepower, coupled with the French disorders caused the French to break. This then exposed the flank of the left hand French battalion which found itself in the unenviable position of having the Walloons' line wheel around to position itself for a devastating attack. I decided to make sure by announcing that they'd fire at half-effect, then charge, but the French didn't stand to receive the charge and broke at the first fire.

Ian's successful charge in the centre had left that regiment high and dry in between my two flanks. While my right flank was busy holding his left, my left was in the process of making short work of his right, and my square was blocking his chasseurs from coming to the infantry's aid. The light dragoons that had been repulsed earlier were now in the perfect position to do something nasty to the isolated infantry, but to be sure, I parked a column of Portuguese troops on the opposite flank of the regiment. The dragoons formed an echeloned line (which was probably superfluous; an ordinary line would have suffieced) then launched a charge next turn that sliced its way through all 3 battalions, sending them reeling to the rear.

The game was declared at an end with the Allies as the victors, but if we'd had time Ian could well have regrouped and come back to try again as there weren't that many battalions that were irretrievably broken.

Another fun swings and roundabouts game that was all the sweeter for being a long-time-coming victory!


My army's setup
The advance to the defensive line
The Spanish in the wheat field
Ian's all-arms attack on the left. Maybe one battalion should have stayed in column?
Coming through the woods...
...and up the hill.
Ian's line regiments...
...maneuver into position
My light dragoons declare their charge, while the light troops scatter to the woods, disordering the chasseurs' counter-charge.
Even though both cavalry columns expanded by 2 figures, my weight of numbers, better quality and the chasseurs' 3 disorders result in a smashing victory to the British
The French legere crowd the woods, while the light dragoons chase the limbered horse artillery.
Come back, you cowards!


The skirmishers advance on the wheat field after the excitement of the cavalry clash, 1 battallion forming in line on the lt. dragoons' flank.
The infantry fired on their flank...
...and knock off a figure, but the doughty dragoons survive the morale test to pursue the guns.
Meanwhile, in the centre...
...the Portuguese form an ancored line to repel the threat of enemy cavalry, but also present a tempting target to the intrepid infantry advancing through the rough terrain.
The reserve battalion forms line on the square to face the threat from the right
The French move through the rough terrain
The developing French threat with the Portuguese square the weak link in the line
The charge goes in against the square...
...sending the Portuguese packing...

...and continues into the light infantry's flank...
...sending them after the Portuguese!
The gap in the British line
Meanwhile, my other light dragoon squadron charged through the Spanish guns...
...at the battalion in the field on the left...
...which managed to form square in the nick of time...
... to send the cavalry packing!
On the other flank, a legere battalion forms up in column...
...and charges the Walloons who fire. The ensuing combat results in a draw with both sides withdrawing.
The Spanish guns turn around to fire on the column's flank which then precipitates the next crisis...
...the charge on the guns' flank!
Run away to live another day!
The dragoons recover in time to face the threat.
To the French rear, the triumphmant light dragoons finally succumb to the legere's tenacity...
...and break...
...giving the horse guns the space to wreak their revenge!
Back on the right flank the British try to reform a defensive line...
...while the French try to prevent them! One battalion charges...
...but is sent packing by the British line's firepower!
The hussars try against the Portuguese closed column, pushing them back and leaving the highlanders exposed.
The chasseurs to the left spooked the highanders into square, just in time for a regimental charge...
...leaving a tartan smear behind!
The victorious French were now isolated, while my cavalry were perfectly positioned for a counter-attack on their flank.
After seeinig off another legere charge in the field...

...the Walloons direct their attention to the next battalion's flank...
...sending them packing, too, which secures the flanks...
...for the Spanish to line up on the chasseurs' flank, while the British square blocks the cavalry's progress.
The French situation was looking dire before the Spanish cleaned up their flank.
The situation got worse once the charge went in...
...smashing one battalion...
...after another...
...until a critical mass of battalions were fleeing resulting in victory to the Allies!